
Tutorial
Note that this is not intended to be a complete tutorial for reading sheet music, or for playing whistle. It is just intended to give you the basics to start enjoying this wonderful instrument.
More complete tutorials are available for
purchase in our Online Catalog.
You might also want to take a look at our Slow Session Page. You'll find some free sheetmusic there, as well as recording of the tunes taken at a slower pace.
Lesson 2 - Note Values and Counting
Lesson 3 - Eight Notes and First Song
Lesson 4 - Slurs & Ties (and First Song - Revisited)
The Basics
This tutorial concentrates on playing a whistle that is made in the key of "D". Many other keys are available - the fingering for the major scale on any whistle will be the same, but the actual note played will be higher or lower. First, a few terms used in this tutorial:
Key - The key of the whistle tells you the lowest note of the major scale that you can play on on that whistle. All whistles are capable of playing a two octave range. For instance, a "D" whistle's lowest note is D (the note above middle C on a piano).
Major Scale - The major scale consists of 7 different notes, and an 8th note that is the same as the first - just an octave higher. The Major Scale is the scale that you use when singing "Do, Re, Mi, Fa, So, La, Ti, Do". Note that the low "Do" and the high "Do" are the same note when this scale is sung or played - just an octave apart. Whistle is capable of playing the tones in between the notes of this scale also (sharps and flats), by using half-hole fingering and cross fingering (more on this later). Since a whistle has a two octave range, it can play this major scale in the lower octave, and then again in the upper octave.
Natural Notes of a major scale - The notes that make up Do, Re, Mi, Fa... for an entire scale. These may include sharps or flats (flats are not covered in this Tutorial), depending on the key you're playing in.
Phrase - A section of the tune, similar to a sentence in a story. In the example above, a phrase would be "Do, a deer, a female deer". A phrase could usually almost be a mini-tune all by itself, and the end of a phrase is usually a good place to take a breath when playing.
Over-blowing - Blowing slightly harder to reach the notes in the upper octave. Notes in both octaves are fingered exactly the same (there are some alternate fingerings also).
Ornamentation - These are embellishments that give your tunes a personality all their own. Traditional ornamentations include Cuts, Rolls, Bends, Trills, and many others. More on this later.
Soprano D Whistle - This is the most popular whistle, and is the one that we recommend that all new players start with. It is also the one that should be used with this tutorial.
Low D Whistle - A much larger whistle that is gaining in popularity. It is very difficult to learn to play, because of the larger finger holes, and the wide finger spacing. For more info on Low D whistles, take a look at our Low D Info Page.
Fipple - The entire mouthpiece is sometimes referred to as the fipple, but it is actually the plug in the mouthpiece that restricts airflow - thus producing sound.
Let's Get Started:
Hold the whistle with your left hand so that your index, middle and ring fingers cover the top three holes (the holes closest to the mouthpiece). Use the same three fingers on your right hand to cover the lower three holes. Don't use the tips of your fingers - hold your fingers flat, and use the "pads" of your fingers to play. This may not be quite as comfortable a finger position to use at first, but you will get used to it, and it is a must for when you start playing faster. You'll find that you can cover the holes with a lot less pressure this way, which allows your fingers to move more naturally.
Place the whistle in your mouth, and blow a gentle, steady note. Don't bite down on the mouthpiece, just relax. If the note isn't clear, check to make sure that every one of your fingers is covering its hole completely. The note you are playing with all the finger holes covered is "D" - this is one of the hardest note to play clearly on the whistle, so when you get it to sound clear you're well on your way.
Reading Sheetmusic
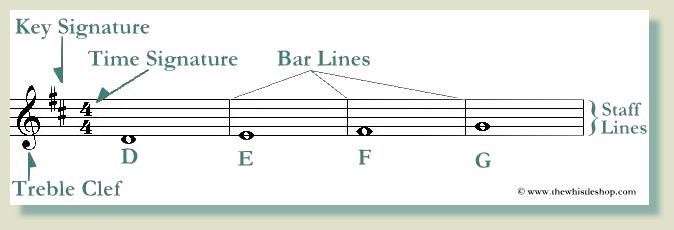
Now we'll move on to some basics about sheet music. Look at the picture below. The five lines that go all the way across the page horizontally make up the "Staff". On the left side of the staff is a symbol that tells you that the sheet music is written in the "Treble Clef". You'll probably only be reading music written in the treble clef while playing whistle, so it's the only clef that we cover in this tutorial.
To the right of the treble clef is the "Key Signature". The # symbol (called a "Sharp") tells you that you need to raise the pitch � step from the note that's written (don't worry if this doesn't make sense right now, it will later...).
Next to the key signature is the "Time Signature". This tells you how to count the tune as you're playing. The top number tells you how many beats are in a measure, the bottom number tells you which note to count as one beat (again, this probably doesn't make much sense yet, but it will). In the example below, 4/4 time means: four beats to a measure, and a quarter note is one beat long.
The vertical lines are called "Bars" and are used to separate the measures.
Fingering Chart
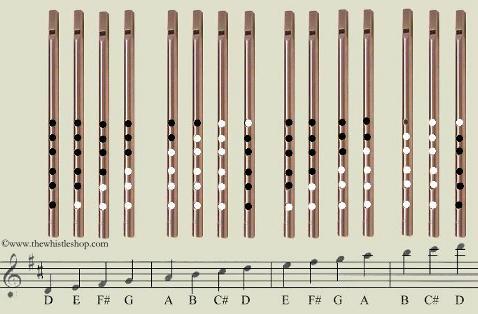
Next, we'll look at the notes that make up the staff. The picture below has the notes on the staff marked, and the fingering for each note in the two octave D Scale. Note that all the F's and all the C's are sharped (the # symbol). A tune with these two sharps in the "Key Signature" is written in the key of D (which is why we're using a D whistle...). If the # symbols are on F and C at the beginning of the tune, they are played as sharps throughout the entire tune.
The fingering chart below uses black for the holes that your fingers cover, and white for the open holes. Remember to completely cover each hole when you put your fingers down, and use the pads of your fingers - not the fingertips.
The notes from the second D and up are played by "Over-blowing". Just blow a little harder, and the sound will go up an octave. Note that the two higher D's can be played with all fingers down, but usually sound better lifting the first finger of your left hand.
Notice that the "tails" on the notes above change
position on the first "B" in the above chart. This is just done for looks - the
note values remain the same.
Here is a link to a more detailed Fingering Chart that also shows fingerings for whistles in other keys, "Secondary" keys for a given whistle, and the "Minor" key (page opens in a new browser window). Don't worry if this talk of Secondary and Minor keys makes no sense to you yet...
When clicking on the links to the sound clips in the tutorial, your Internet browser may display a box asking if you want to "Save this file to disk" or "Open this file from its current location".
You are more than welcome to save the tunes to disk for future personal use at a later time, but to listen to them as you go through the tutorial it is much simpler to "open them from their current location".
Copyright 1998 - 2021
The Whistle Shop
Privacy
Statement
Return Policy