
Low Whistles
And the "Piper's Grip"
When played properly, the Low Whistle's haunting sound quality is unequaled. It is probably most easily recognized from Davey Spillane's unforgettable performance in "Riverdance", and from "My Heart Will Go On" from the soundtrack for "Titanic".
Low Whistles (especially the Low D whistle) can be very intimidating at first - the finger holes are very large, and spaced very far apart. We ALWAYS recommend that you pick up a Soprano D whistle first to learn on, then move on to the Low Whistle later!
The Low D Whistle is fingered exactly the same as on the Soprano D Whistle, but finger placement is quite a bit different. Because of the wide distance between holes, you'll need to use the "Piper's Grip" (or a "modified" version of the Piper's Grip - explained below).
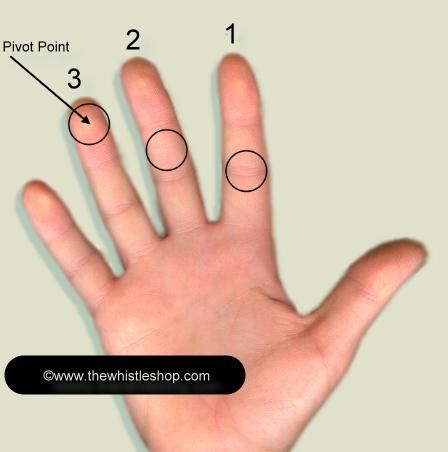
Using the (modified) Piper's Grip on a Low Whistle:
Only the right hand is used in the instructions and images below; both hands are positioned in basically the same manner.
Using a form of the Piper's Grip
when playing the Low Whistle (especially the Low D whistle) isn't just a
recommendation; it's pretty much a requirement! Unless you have very big hands,
you won't be able to position your fingers the same way that you would on your
Soprano D whistle!
-
Put Finger #3 (your Ring Finger) down first, so that the first pad of this finger is covering the lowest finger hole on the whistle (the "D" hole). Make sure that you're using the "pad" of this finger (as shown in the image above), NOT the finger tip!
-
Hold the rest of your fingers and your thumb as shown above, so that your fingers are fairly straight (and relaxed!), and spaced slightly apart. Right now, your third finger is the only one that's actually on its hole, and your thumb is just kind of hanging out there doing nothing. Now position your hand so that is at a right angle from the whistle (just ignore the other two finger holes for now; you'll be covering them in the next step).
-
Using Finger #3 as the pivot point (leave it in position on its hole), slowly move your thumb up (toward your face) until you've rotated your hand approximately 45� or so, then bring your thumb behind the whistle to support it. Hey, look at that!!! Your other fingers should have come to rest quite naturally over the other two finger holes, so that the black circles shown in the pic above all line up on their holes. You'll be using the 2nd pad on Finger #2 - Finger #1 will be covering the hole right at the lowest joint on that finger.
-
You'll probably have to curl Finger #1 (your Index Finger) around the whistle a little. Curling the index finger around the whistle actually comes in pretty handy on your left hand. By simply straightening this finger out when you're playing the note "B" (so that the "B" hole opens slightly), you can quite easily play a half-holed Cnatural!
-
Don't use these finger positioning instructions as something that's "written in stone"! Use these instructions as a starting guide; try it like this for a few days, then modify it in whatever way you see fit to be able to comfortably play your whistle.
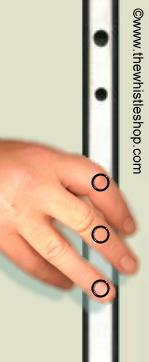
The image below shows the proper right hand position for this "Modified Piper's Grip". The picture is of our Owner's hand (Thom Larson) on an Overton Low D Whistle. Thom's hands are average size - you can see that his fingers are not at all stretched or uncomfortable!
Tips for Learning:
-
We see it all the time when people come in to our shop - when a new player picks up a Low D whistle, the first thing that they'll do is try to cover all the holes, then try to play the Low D note. Don't do it - it'll only frustrate you! First get used to getting your fingers to fall on the holes correctly. You can blow into the whistle while you're doing this, but don't worry at all about squeaks and squawks; all you're doing at this point is getting your fingers used to falling where they should.
-
After you have your fingers somewhat used to the spacing of the holes, you're ready to start playing for real! Start on the higher notes of the first (lower) octave - play a "C#" (all finger holes open), then play a "B" (first finger only down), then go on down the scale one note at a time. Hold each note for a while, concentrating on making each one sound nice and clean (you might have to move your fingers around a little to get them seated properly on their holes).
-
When you get down the "D" note (all finger holes closed), go slowly back up the scale again, holding each note as you did on the way down.
-
If you have trouble hitting the lowest few notes, just skip them for now. Work on getting comfortable playing some of the higher notes cleanly first, then move on to the lower notes later (slowly, and one at a time).
-
Once you can play all the notes in the lower octave comfortably and consistently, it's time to start working on the upper octave. Start on the 2nd octave D and slowly go up the scale to the High B, then back down again (holding each note as you go).
-
Repeat these exercises often, until the finger spacings feel comfortable, and you're not squeaking. It'll probably be a bit frustrating for a while, but stick with it - Low Whistle is very rewarding once you get the hang of it!
Additional Hints:
Don't push down on the finger holes so hard that your hands start cramping - if one of your fingers isn't covering a hole properly when your hand is fairly relaxed, you should be able to just reposition that finger a little to cover its hole better.
The Sixth Hole (the "D" hole) is spaced pretty far from the others. If you simply can't reach it using the method shown above, try using your little finger (your 4th finger) for the D hole. This isn't the best way to do it (your 4th finger probably isn't nearly as dexterous as your 3rd finger), but if it makes it so that you can play, then go for it.
Playing a Low Whistle is going to feel very strange and unnatural at first; you'll feel like it's just about impossible when you first pick it up. Just keep at it; it'll feel quite comfortable pretty quickly! We firmly believe that just about any teen or adult can play a Low D whistle (a possible exception is if you have fingers that are so narrow that they simply can't cover the holes completely).
It's very easy to accidentally leave a finger hole partially open on a Low Whistle (even if you think that they're all closed completely). If you're getting a squeak or a squawk, that's probably why.
See the Low Whistle Section of our Online Catalog for pricing and descriptions!
You might also want to take a look at:
Ireland's Best Slow Airs - If you're looking for a very good collection of tunes to play on your Low D whistle, you may want to take a look at this collection of 110 slow airs!
Copyright 1998 - 2021
The Whistle Shop
Privacy
Statement
Return Policy